

Rockets are lots of fun when you are launching them. However, finding them can be an arduous if not maddening task. Fancy space rockets have lots of tracking equipment to make touchdowns as simple as pie. Today, we look at embedding LEDs into your hobby rocket for easy night flight fun!
Materials
- Hobby rocket
- Hobby rocket motors
- Hobby rocket wadding
- Hobby rocket igniters
- Hobby rocket remote ignition system
- Coin cell batteries
- LEDs
- Electrical tape
- Scotch tape
Step 1 Make LED Modules
As this is our first test, we are going to embed some cheap LED lights into the body of the rocket. LEDs generally work well at 3 volts and can be powered buy a 3 volt coin cell battery with no other parts.
![]()
To make the module, sandwich the battery between the leads of the LED. Be sure the longer lead is on the positive side of the battery. Once in place, use electrical tape to secure the LED to the battery. Your LED should be glowing permanently now.
Step 2 Attach LED Modules
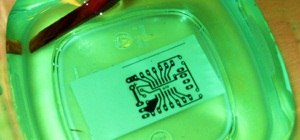
I decided to test two parts of the rocket. I placed one LED module in the center body of the rocket.
![]()
I placed another on the underside of one of these cool shuttle gliders that hang off the side of the main rocket.
![]()
Step 3 Set Up Rocket
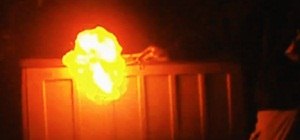
I had less than ideal circumstances for my first test launch. It was raining. Do no attempt to fire rockets in the rain! It just turns into and endless afternoon of drying and adjusting igniters.
Additionally, due to the failure and intense heat of our very first rocket, the base plate of the launcher would only launch at a roughly 80 degree angle to the ground.
![]()
Be sure you launch pad is in working order. Pick a sunny windless day. Bring friends to help you find your rocket.
![]()
Step 4 Launch!
Time to launch your rocket!
Our launch did no go well in the traditional sense, but it did yield some useful information. The nose cone and parachute assembly did not open at the top of the flight arc as intended. Despite crashing full force into the wet ground, the rocket is still in perfect condition. The LED inside the rocket body survived without a scratch. The recovery wadding placed between the rocket motor and the LED module fully protected out electronics from any heat or fire damage. The LED module on the shuttle was thrown clear of the rocket on impact, but remained perfectly intact in the mud.
Now that we know it is generally safe for electronics, the Galactic Invasion can start testing radio communication and perhaps robotization of our space program! Share your experience and opinions in the forum to help the Galactic Invasion push forward. Remember to post your own rocket pictures and videos on the community corkboard.
Just updated your iPhone? You'll find new emoji, enhanced security, podcast transcripts, Apple Cash virtual numbers, and other useful features. There are even new additions hidden within Safari. Find out what's new and changed on your iPhone with the iOS 17.4 update.


3 Comments
I wonder if I can find a servo small enough to fit inside the rocket...
whered u guys get the LEDS?
You can get LEDs out of any old junk with lights in it. They also have them at radioshack and you can order them online from sparkfun, adafruit, digikey, or other places.
Share Your Thoughts