


Computer viruses are terrifying. They are undetectable, dangerous, and operate constantly right under your nose. For the average computer user, there are only a few repair options. You could buy expensive antivirus software that causes more problems than it fixes, you can wipe your hard drive clean and lose all of your important data, or if all else fails—just switch to Linux.

But what if you could give your enemies a virus that was immortal and undetectable?
The virus we're making today cannot be wiped out, because it becomes a physical part of your victim's computer. Every time your victim starts up their desktop, our virus will wait a random amount of time before suddenly cutting off all power! The random time delay will mean hours, if not days, of puzzled existential crisis for your roommate writing his or her thesis paper.
It's the perfect prank.
Materials
- Arduino
- Protoboard
- 5 volt relay
- Wire
- Screw terminal
- Male header pins
- 9 to 12 volt RC battery
- LED
- 100 ohm resistor
Understanding Relays
The relay is the component that will physically redirect the power coming into the computer. A relay contains an electromagnetic coil—like the one we made for the X-Men Glove—that is turned on and off by a signal from the Arduino. When the Arduino activates the coil, the electromagnetic field created by the current in the coil pulls a piece of metal from one contact to another, thus redirecting the flow of electricity from the computer to a broken circuit.

The coil needs to be rated at 5 volts, because that is maximum power the Arduino can put out.
You will have to play around with your relay to find out which pins are the coil pins and which direction electricity flows when the coil is on or off. Attach wires to all of the pins on your relay to make it easy to breadboard the connections. When you attach the 5 volt pin on the Arduino to one end of the coil, and the ground pin on the Arduino to the other end of the coil, you will hear a clicking sound. That is the sound of the magnetic coil pulling the contacts into position. Keep connecting 5 volts and ground to all of the pins until you get that sound.
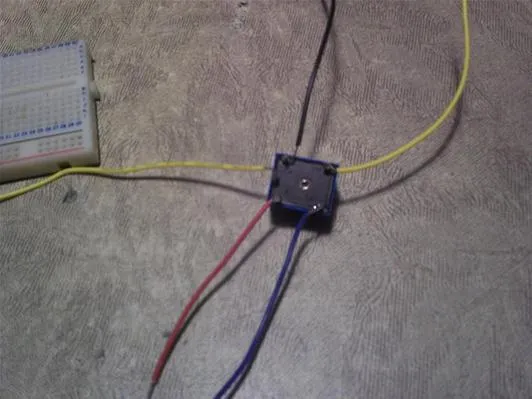
The virus-laden relay tentacles awake and stretch in preparation for menace and mayhem.
The pins on the relay do not easily fit into a breadboard. Long jumper wires help the prototyping process. Once you find the coil pins, use an LED and resistor to test where power is flowing around the other pins. Remember that the short lead of the LED is the negative side and must be facing the resistor.
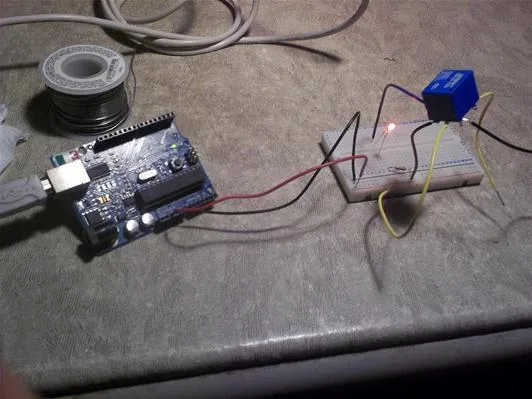
Here, the Arduino is sending 5 volts to the relay coil to turn on an LED. Additionally, our relay has learned to stand upright and inspire War of the Worlds-esque terror.
Here is the relay test circuit:
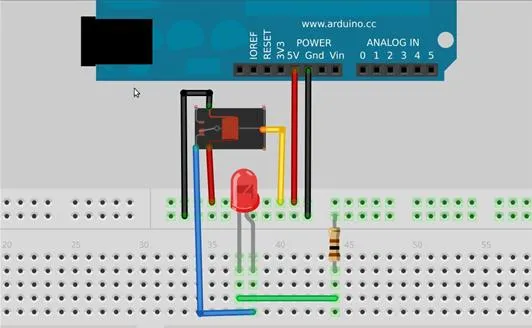
Remember that when using breadboards, the top holes are connected horizontally while the lower holes are connected vertically.
The red and black wires on the right are bringing power and ground to the top two rows. The red and black wires on the left are taking power and ground from the top rows and putting them into the coil to activate the relay. The yellow wire is bringing 5 volts into the relay to be switched on and off, depending on the state of the coil. The blue wire is where the 5 volts from the yellow wire exits the relay and connects to the positive side of the LED. When the relay is in the correct position, the LED should turn on as power flows through the LED and then the resistor to ground.
Once you have this working, connect and disconnect the power or ground pin from the Arduino several times. Your light should blink on and off while the relay makes a clicking noise. Note that in the final board, the yellow and blue wires will be connected to screw terminals to hook into the computer power. That means that the real board will be pushing 120 volts through the yellow and green wires. However, for the test circuit we use 5 volts because it's convenient.
Understanding the Circuit
My relay had two settings. When the coil was off, electricity would flow from the middle pin to the pin on the top-left of the relay. When the coil was on, electricity flowed from the middle pin to the top-right pin on the relay. Using this information, I decided that the top-left pin would connect to the computer and the top-right pin would not connect to anything.
This way, when the Arduino is running, it does not have to use power to keep the computer running. Only when it wants to turn the computer off does the Arduino have to activate the coil and pull the contact to the top right pin.

When we tell pin 13 to output 5 volts, it will activate the coil and move the tiny switch inside the relay to the right. When the coil is inactive, the switch will stay on the left side, allowing power to flow through the screw terminals to the computer.

By connecting the screw terminals to one of the power lines inside the computer, we put our board in line with the power source and can control it by interrupting the connection via the relay.
Solder the Board
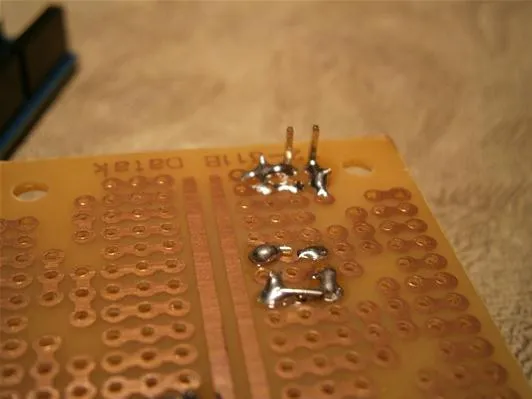
Once you understand your relay and where all the pins are, it's time to create the virus. Using a prototyping board, solder the circuit according to the picture below.

The blue wires carry the power from the computer through the relay. The red wire connects one side of the coil to a male header. The black wire connects the other side of the coil to an adjacent male header. The male headers will fit into pins 13 and ground on your Arduino board.
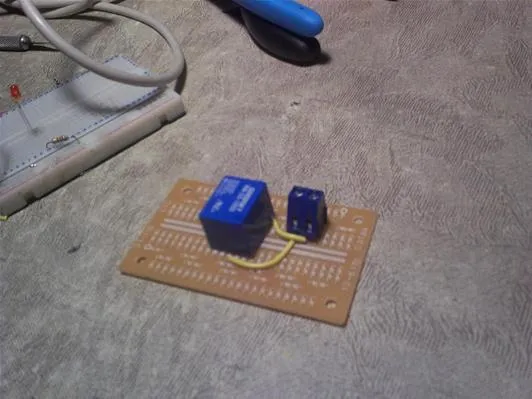
Our virus slowly mutates with each dose of lead poisoning.
And here we are, attaching the board to the Arduino:

The headers on the left poke through the bottom of the board to connect to pin 13 and ground on the Arduino. The headers on the right were just to add stability. They do not make any electrical connection. The yellow wires above are directing the computer power through the relay via the screw terminals.
Note that you should use wire at least as thick as the wire you find inside your computer for the yellow wired portion of the circuit. If the wires are too thin, they could heat up and melt their insulation.
Here, you can see the headers sticking out, ready to plug into the Arduino.
The underside of the board is all soldered up.

There very few solder joints.

Pin 13 and ground are directly next to each other on the Arduino. Make sure to place the headers in these sockets when using the virus.
Upload the Code
Plug your Arduino into your computer and open up the Arduino software. Load this code into an empty sketch and upload it onto your Arduino board. This particular code is quite simple, so we will go through the meaning of each line in the code.

Install Computer Parasite
Once the code is uploaded, we can start hacking away at our victim's computer.
Open up the computer case and find the power supply box. This is where the power from the wall enters the computer. No two computers are exactly the same, but you will definitely need a screwdriver to get the power box open.

Once inside the power supply, locate the wires that are connected directly to the external power plug. This is the life force of the computer. Cut one of the wires coming from the external power plug.
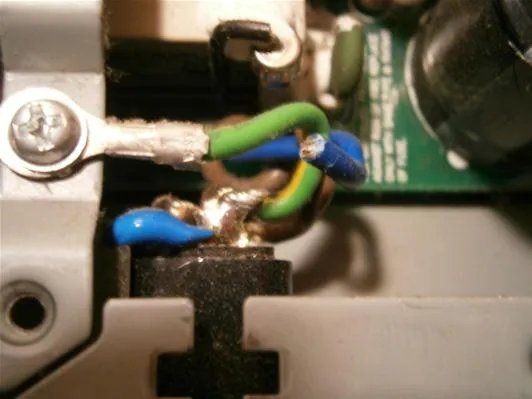
We just cut the computer's aorta.
And solder two wires to the exposed ends of the computer wire.
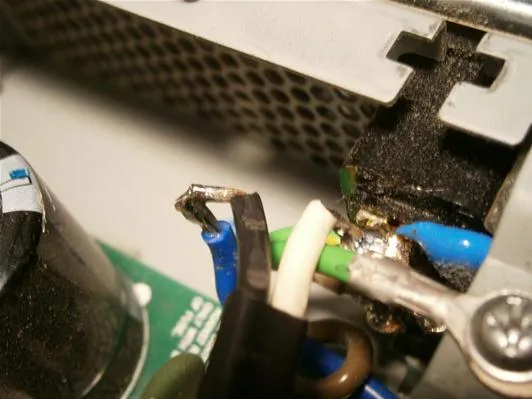
The hefty black and white wire will bring the current to the screw terminals on our virus board.
Be sure to insulate exposed wires with heat shrink tubing and electrical tape!

Close up the power box and connect the two wires to the screw terminals on the board.

Plug in an rechargeable battery between 6 and 12 volts. A regular 9 volt battery is unlikely to have enough current to switch the relay. The RC battery also means your virus will have a much longer lifespan.
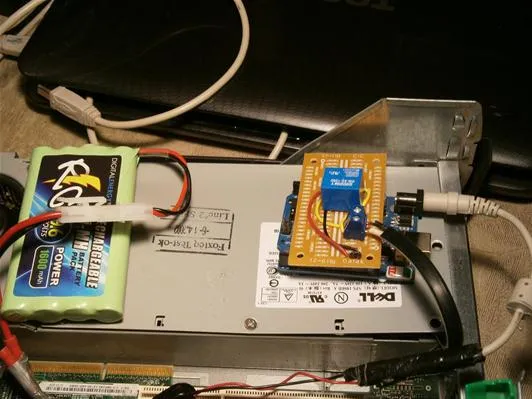
I have a very crude hacked-together battery connection going on here. As long as you plug the battery into the Arduino, you will be fine.
Use velcro or tape to secure the Arduino to the computer case. Be sure to insulate the pins on the bottom of the Arduino so they do not short circuit against the metal shell of the computer.

Now, close up the computer and put it back on your victim's desk. While they are working, they will find that for no reason and with no pattern, their computer shuts off at random intervals between one minute and an hour.

Warning
- This project involves working with high voltage circuits. I am not responsible for any injury or death that comes as a result of attempting this project.
- I am not responsible for you being murdered by your roommate for accidentally deleting her dissertation.
This hack could be applied to any device with enough space to fit an Arduino board. If you want to be really mean, you could build a random channel selector inside a television or randomly turn off a living room light—even a treadmill. The possibilities are endless. Share your fun ideas for this project in our forum.
If you try this yourself and manage to take video or pictures of your roommates agonizing over their computers, make sure to share their pain with us by posting to the community corkboard.
Photos by Hil (bug), Mocete (bite), TechTricksWorld (frustration)


Comments
Be the first, drop a comment!