Etching your own circuit boards is tons of fun, but etching requires strong chemicals to dissolve the copper plating on blank circuit boards. The normal ferric chloride solution works well, but can be expensive and leaves permanent stains. Luckily, we can whip up our own etchant at home with everyday chemicals! Better yet, our new etchant will turn an eerie green color rather than the dull brown of ferric chloride.
Materials
- Muriatic Acid
- Hydrogen Peroxide
Step 1 Get Chemicals
Hydrogen peroxide is available at any drug store. It usually comes in a 3% solution for medical purposes. This will be fine for etching. If you have a higher concentration of hydrogen peroxide, be sure to dilute it to 3% before mixing anything.
 Photo by Apartment Therapy
Muriatic acid is available at most hardware stores. It is used in pools and as paint thinner, among other things. Muriatic acid is just a 30% solution of hydrochloric acid in water.
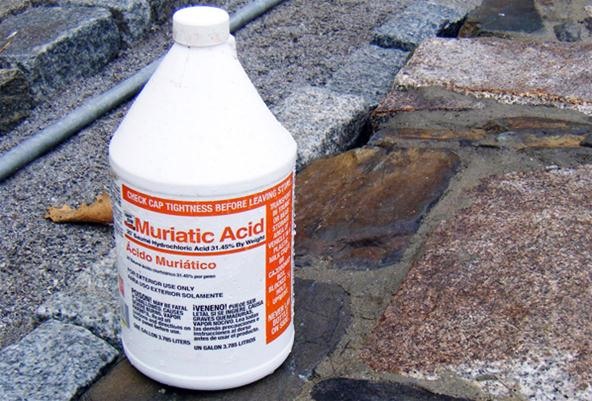 Photo by Joe Norton
Warnings
- Do not touch, breath, or ingest muriatic acid!
- Use respiratory protection when opening the bottle of acid.
Step 2 Mixing
Mix two-parts of diluted hydrogen peroxide with one-part muriatic acid. There you are, done!
The hydrogen peroxide acts as an oxidizer allowing the acid to eat away the copper. Place your board to be etched in your new solution and watch it go! Your board will etch suspiciously fast, but don't worry, that's what is supposed to happen!
After the first etch, you should notice the solution starting to acquire a light green tint. This is the copper that has dissolved into the solution. This green color will grow deeper with each use. The dissolved copper creates cupric chloride which can itself be used to etch metal.
 Photo by vkoudymov
Keeping the ratio of hydrogen peroxide to hydrochloric acid is rather difficult over the course of multiple etchings. Both solutions contain water and the etching reaction itself produces water. As I am no chemist, reproduced below is some chemical information concerning cupric chloride etching.
Hydrogen Peroxide As a Replenisher
This is a quote directly from RD Chemicals:
"The Hydrogen Peroxide (H2O2) system of replenishing has been popular in the Photochemical Milling industry. Using this system requires a reliable control system, for both components required to replenish the system, Hydrogen Peroxide, and Hydrochloric Acid.
The use of Hydrogen Peroxide also produces a purer Cupric Chloride, without Sodium Chloride (NaCl) impurities, but the Hydrochloric Acid level must be carefully monitored, as it is consumed in the regeneration part of the reaction. This replenishment method also suffers from the fact that over-replenishing with the Hydrogen Peroxide can generate free Chlorine gas."
Follow this link for more information.
If you want to get the maximum amount of copper into your cupric chloride solution, check out this awesome tutorial.
Warnings
- If you didn't catch that, messing up this solution can cause the release of chlorine gas which is a chemical weapon and quite nasty. Do not mess with adding lots of hydrogen peroxide to your solution unless you have a reliable way of measuring the solution contents. Always perform dangerous chemistry outside or under a fume hood.
- As a side not, melting PVC can also release chlorine gas. Do not laser etch your moleskin notebooks!
Hydrogen peroxide is unstable and breaks down very quickly when exposed to light (hence the opaque brown bottle at the pharmacy). Store the etchant solution in an airtight opaque container to maintain the ratio of chemicals. If exposed to light, the ratios will be out of balance and your etchant will work at a snail's pace.
Admitting Ignorance and Venturing Onward
I am sorely lacking in chemistry knowledge, but one thing did catch my eye about cupric chloride etching. You can monitor the hydrochloric acid content by testing the conductivity of the solution just like with our automatic garden project!
You would have to calibrate the desired voltage based on empirical tests with etching speeds, but in theory, you can monitor the HCL level using an Arduino analog input. The hydrogen peroxide is monitored with an oxidation/reduction potential (ORP) meter. These meters are not cheap, but they are attainable.
Work the output into an Arduino controller and you could automate the dispensing of muriatic acid and hydrogen peroxide to keep your etchant in perfect working condition. Be sure to enclose your entire acid tank so that no light can get in and break down the hydrogen peroxide.
 Photo by 5pcb.com
If you can pull all this off, you will essentially have a factory grade etchant at your disposal that doesn't need to be carefully disposed of because you can reuse it. The ingredients are cheap and available. The hard part is figuring out the perfect ratios of chemicals once you start etching.
I plan on doing some more experiments with this etchant in the near future. If we can get the chemical rations stabilized with an Arduino dispenser setup, I will have an infinite etch tank and never need to handle etchant acids again! Yay for safety.
 Image by Simpsons Wiki
In this case, safety will come after very careful and precarious chemistry, so If you decide to take this project on, always wear chemical grade protective gear for your hands, body, and face. Do not forget eye protection!
Questions? Concerns?
How do you etch your boards? Let us know in the comments below or post up a thread in the forum for posterity. If you have any questions, suggestions, or corrections, feel free to message me personally.
Don't forget! We are currently accepting entries into our photo contest for a chance to win your very own lucid dreaming goggles kit! Just post a picture on the corkboard of a project you have made or are currently working on. All projects are welcome. Here is my example entry.
Main photo by Wired
Just updated your iPhone? You'll find new emoji, enhanced security, podcast transcripts, Apple Cash virtual numbers, and other useful features. There are even new additions hidden within Safari. Find out what's new and changed on your iPhone with the iOS 17.4 update.
















Be the First to Comment
Share Your Thoughts